

How to install Lightroom Presets on Mobile or Desktop
New 2021 Version


Adobe Lightroom
In this tutorial we want to show you how quick and easy it is to install Lightroom presets onto your desktop application or smartphone. If you're using a mobile, please download the free Lightroom app from the app store & if you're using the computer version of Lightroom CC then you can either get a free trial or get the subscription from Adobe. Then all you got to do is follow the steps below!
If you already have the Desktop version of Lightroom, you can easily sync your presets from your Desktop to your smartphone. Please follow the video tutorial at the bottom of this page.
You don't need a computer to use Lightroom Mobile Presets, all you need is to download them directly from the purchase to your phone, then import them into the app. In our Lightroom Presets we have made it super easy for you to download from our server to your phone.
Desktop Installation - Mac & PC
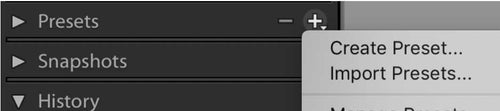
Option 1: Quick Version for installing presets in Lightroom CC
Open the 'Develop' workspace in your software in the top right of the program.
Now it is possible to install Lightroom presets using the '+' icon on the 'Presets' section to the left side of the program.
Option 2: Longer version but works on all versions of Lightroom 4, 5, 6 and CC
- Open Lightroom
- Go to: Edit - Preferences - Presets
- Click on the box called ‘Show Lightroom Presets Folder’
- Double click on 'Lightroom'
- Double click on 'Develop Presets'
- Copy the folder(s) of your presets into the 'Develop Presets' folder
- Restart Lightroom
How to install Lightroom Presets in 10 seconds
Featured presets in this video are from our Lightroom Presets Master Collection.
Mobile Installation
All phones will not use the same preset files as the desktop versions. With mobile presets they arrive as DNG photo files. A DNG file is a RAW photo that holds all the color data including the Lightroom desktop application data, this means that you will be able to edit all parameters of the presets.
1. Download the presets to your phone
Download the DNG presets to your mobile.
Many presets for mobile are only downloadable as ZIP files due to web restrictions. In this case you will need to first unzip the zip file to access your presets. Please follow Option 1 below if you need to unzip using a mobile device. If not then go straight to Option 2.
Option 1 - Using only mobile without a computer
You can use apps like iZip to unzip the file directly to your phone from the store you bought them from. Download the file and then tap on ‘Open in iZip’.
Once you’ve unzipped the file, go to Step 2 to import the photos into Lightroom.
Option 2 - Using a computer to send your presets to your mobile
Send the Lightroom Mobile presets from your computer to your mobile using Dropbox, Airdrop or something similar.
Airdrop is an incredible invention by Apple so you will only find this feature on iPhones, iPads and Mac. Please click here to follow a tutorial by Apple to learn how to use Airdrop.
If you use Android then please use Dropbox, Google Drive or similar.
2. Open Lightroom Mobile
Open Lightroom Mobile on your phone. In these next steps, we will import the DNG files from your camera roll or photo library.
Do not be worried if your photos show up as blank photos in your photo library, this is just how DNG files will look before sending them to Lightroom as some mobile cannot read DNG natively. A DNG file is essentially a RAW photo file that carries all the data of the preset.
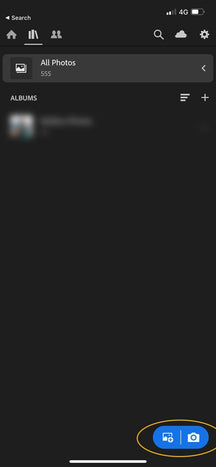
3. Press the icon
Press the blue import icon as shown to the left.
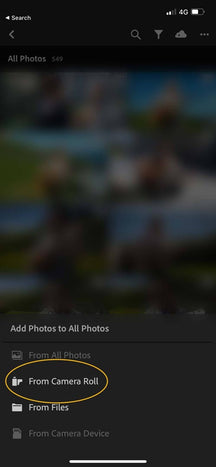
4. Choose the location
Choose the location on your phone where you downloaded the presets (usually the camera roll or photo library).
If you used iZip they may be inside the iZip application.
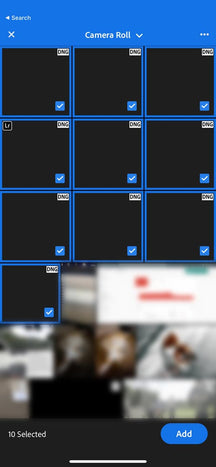
5. Select the DNG Files
Select all the DNG preset files you want to import.
6. Import the DNG Files
The DNG files will now load into the Lightroom Mobile app.
7. Choose one of the files and select (...)
Choose one of the DNG files, then press on the (...) settings button.
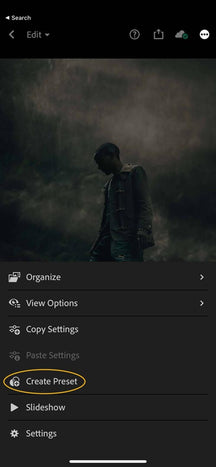
8. Press 'Create Preset'
Press on ‘Create Preset’.
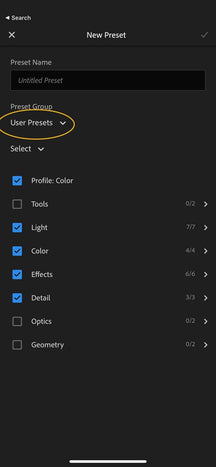
9. Create a group
It’s best practice to save your presets into groups to keep them organised so you know where everything is and can easily access it when you want to.
Press on ‘User Presets’ then press on ‘Create a Group’.
10. Follow previous steps for all presets
Follow these steps for all presets and save them into Lightroom.
11. Done!
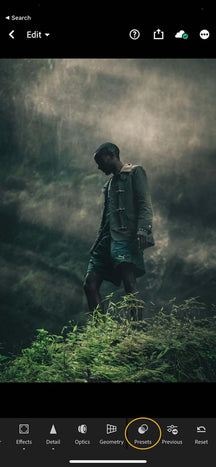
That's it! You can now use all your presets by pressing the ‘Presets’ button shown to the left.
You are done! Have fun using the Lightroom Presets :)
How to sync your Lightroom CC presets over to Lightroom Mobile
All done!
Now you can go ahead and get your favorite presets installed on your computer or mobile then apply them on your photos to get the best out of your work. Get those creative juices flowing!
If you find yourself troubled with any of the above, fear not, we've got you! Just let us know by contacting us and we will get you going in no time.
We have our very own Lightroom Presets Master Collection here if you're interested: