

How to use LUTs in Pinnacle Studio
New & Updated 2021


In order to enhance your colors, you may need to know how to use LUTs in Pinnacle Studio. This is a very straight forward video editing software, and you will be surprised to see how easy it is to add basically any LUT.
LUTs are also known as Look-Up Tables, and they are an important process of color correcting and grading, as well as developing your own editing style that you can apply on many projects. Let’s now go ahead and see how you can add LUTs in Pinnacle Studio and what you need to know when it comes to it.
Important Guidelines Before Using LUTs
- Ensure white balance is correct when using LUTs! This will dramatically change the look of the LUT.
- Ensure your exposure is correct when using LUTs. You can use a histogram to help in camera or editing software.
- When using LUTs, your footage may need small adjustments to get optimal results, such as exposure, saturation, contrast, etc. depending on your preference.
- Shooting conditions such as lighting, weather, locations etc. can vary which can drastically affect a LUTs look. Some LUTs will work better in different scenarios. It’s best practice to experiment with which LUTs work best for your style and scenes.
Download a sample pack of our Creative LUTs here:
If you do not receive an email, please check your spam folder. If you still have not received it, then please contact us and we are always here to help.
How To Use LUTs In Pinnacle Studio
1. Download and unzip the files
In order to be able to add the LUT into the program, you first need to download some LUTs and unzip them in an easily accessible folder. You can find some pretty impressive LUTs in our online store, so don’t forget to also check that out!
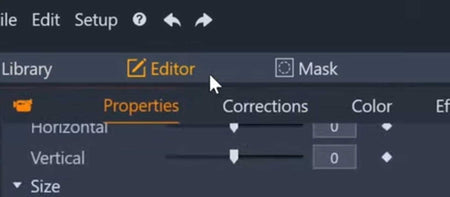
2. Go to the 'Editor' panel, then the 'Color' tab
Select a clip in your timeline, then double click it to open up the 'Editor'. Select the 'Color' tab to open up the color grading window. Make sure the 'Basic' tab is selected.

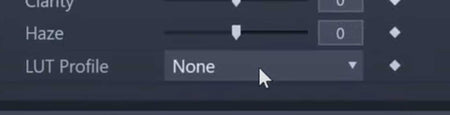
4. Apply The LUT
The last step is, of course, applying the LUT to your project. You can easily do that by dragging and dropping on your footage. Additionally, you can set keyframes, and create neat transitions.
If you encounter any problem with your LUTs, let us know. You can do it by sending us an email using the form on the contact page.
Note:
As every video is different (exposure, white balance, etc.), small adjustments are recommended to achieve an optimal result. Again, please ensure your White Balance is correct before applying a LUT. This can drastically change the LUTs look.