

Stabilize Shaky Video in DaVinci Resolve + Comparisons
If you're a film editor, you likely use post-production tools like DaVinci Resolve 18. DaVinci Resolve has plenty of handy features — one of which is the stabilization of shaky video.
Stabilizing shaky videos can be incredibly useful for many reasons. It comes in handy when editing action-related footage such as a GoPro POV video while performing extreme sports, or maybe your Gimble or Ronin stabilisers weren't working as intended. It also helps just to smoothen up the overall shakiness, making it easier on the eyes.
Either way, we're here to explain how to stabilize shaky videos in the DaVinci Resolve 18 software.
Quick guide
To stabilize shaky footage in DaVinci Resolve 18:
- Optimize your footage for stabilization.
- Open the inspector window of a clip you want to stabilize.
- Adjust the stabilization attributes appropriately.
For a more in-depth explanation of this process, read on.
Detailed guide
1. Optimizing your footage for stabilization
There's no cut-and-dry process to optimizing your footage for stabilization. Doing so depends on factors like whether you're doing it before or after the shoot, what kind of/how much stabilization you need, and — of course — the skills and experience of the production team members.
Preparing footage for stablization pre-shoot
As the editor, you want the cleanest possible footage to work with so that later deterioration doesn't degrade it beyond use. Measures you can recommend to the rest of the team include:
- Shooting at higher video resolutions - helps because digital stablization requires zooming in on the footage slightly to cover the edges.
- Shooting at higher frame rates - this helps smoothen the stablisation between frames. The more you have, the easier it is for the software to stabilize.
- Using specialized camera mounts for specific scenarios
- Using wider lenses and deeper focus - because digital stablization needs to crop in a bit, it's better to shoot a llitle wider if you plan on using this stablization.
- Minimizing grain and noise - this helps because when zooming in on grainy footage, it shows the grain more. Plus, if it's strong, you will see the grain moving around as the video is stablized.
- Avoiding in-camera effects, such as lens flares - this is important as when you stabilize footage with flares, you will see the flare jumping around unnaturally. It's one of the biggest amateur mistakes I see when stabilizing digitally.
- Consider using a global shutter camera - it's not always easy to achieve this, but it was help against the "rolling shutter" effect. A rolling shutter makes frames look sort of wobbly. Global is much better but only available on pro cameras such as the RED Komodo.
Preparing your footage post-shoot
Once footage arrives on the editing table, you must decide which shots to stabilize. Some of the factors that go into making this decision include:
- Digital stablization can look amateur if not done correctly, does the shot really need it?
- How essential a piece of footage is to the narrative (i.e., will it make it to the final cut)
- How well a shot fits into the project's overall aesthetics, including its camera moves
- Whether less shaky alternatives might work as well
- If the entire clip needs to be stabilized, or only a portion of it
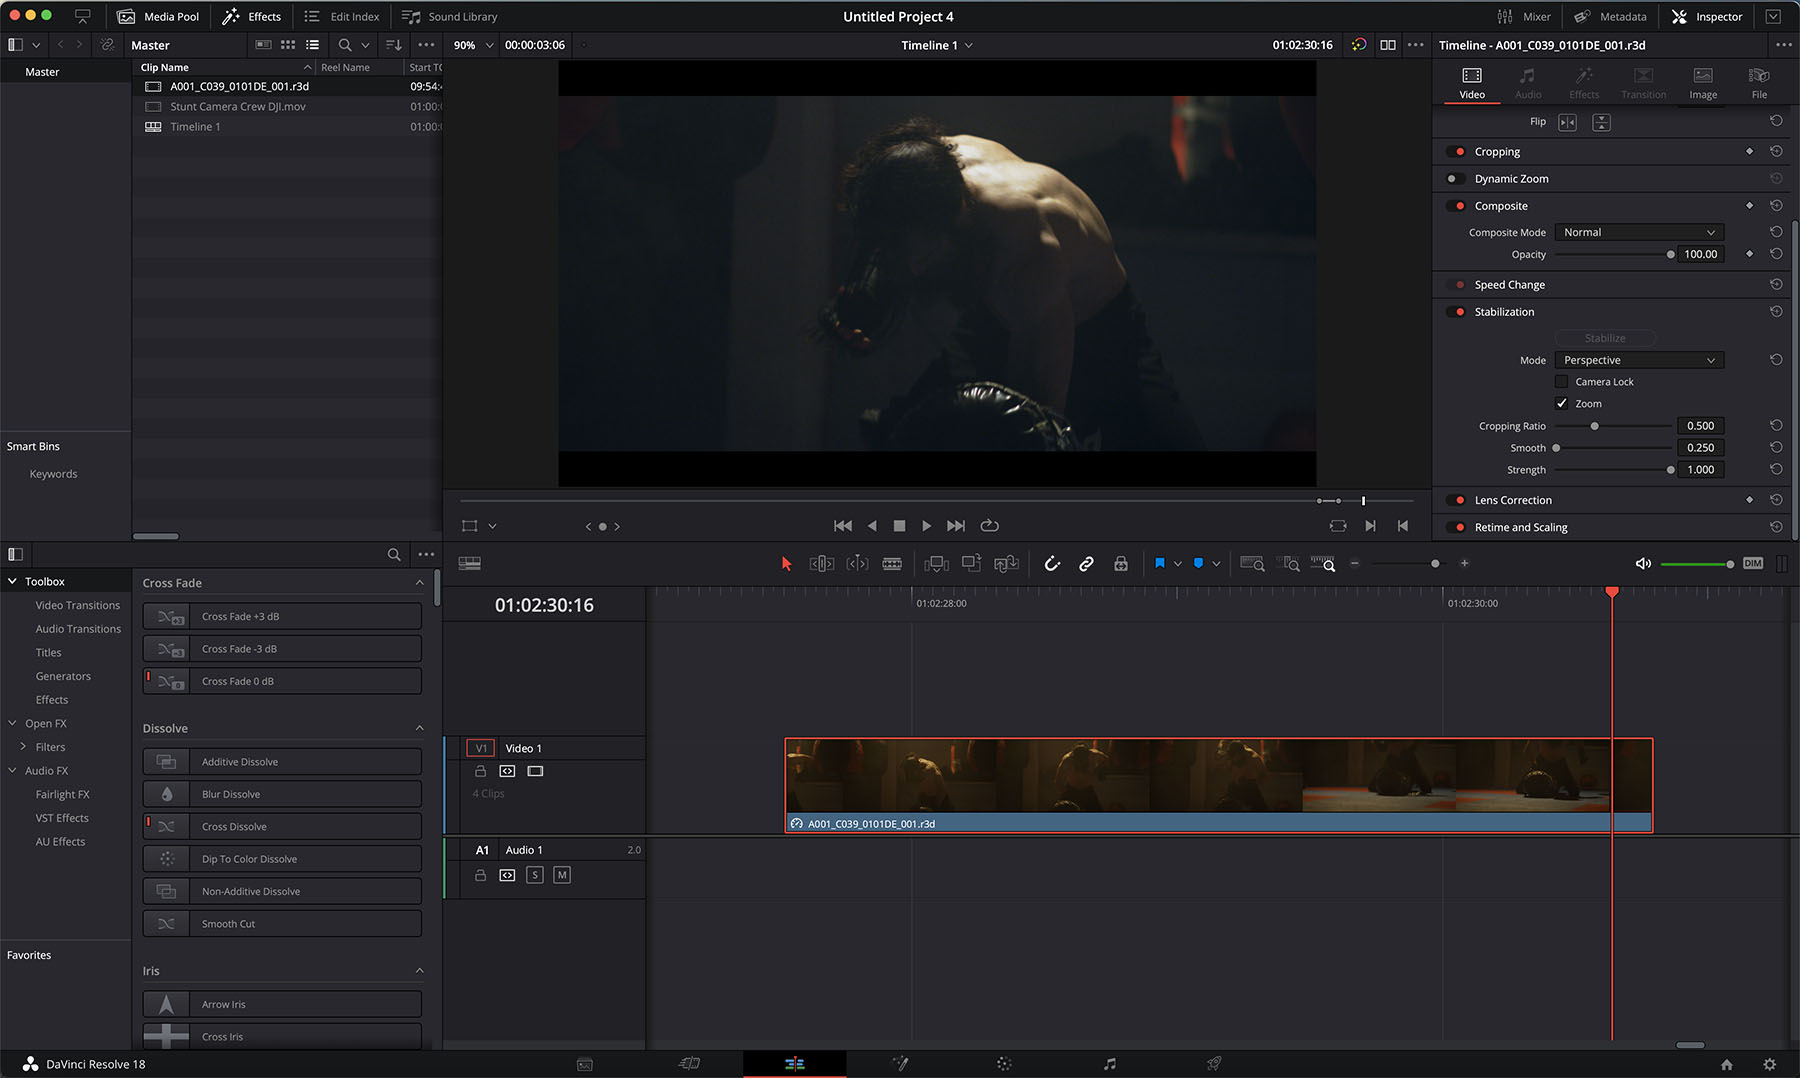
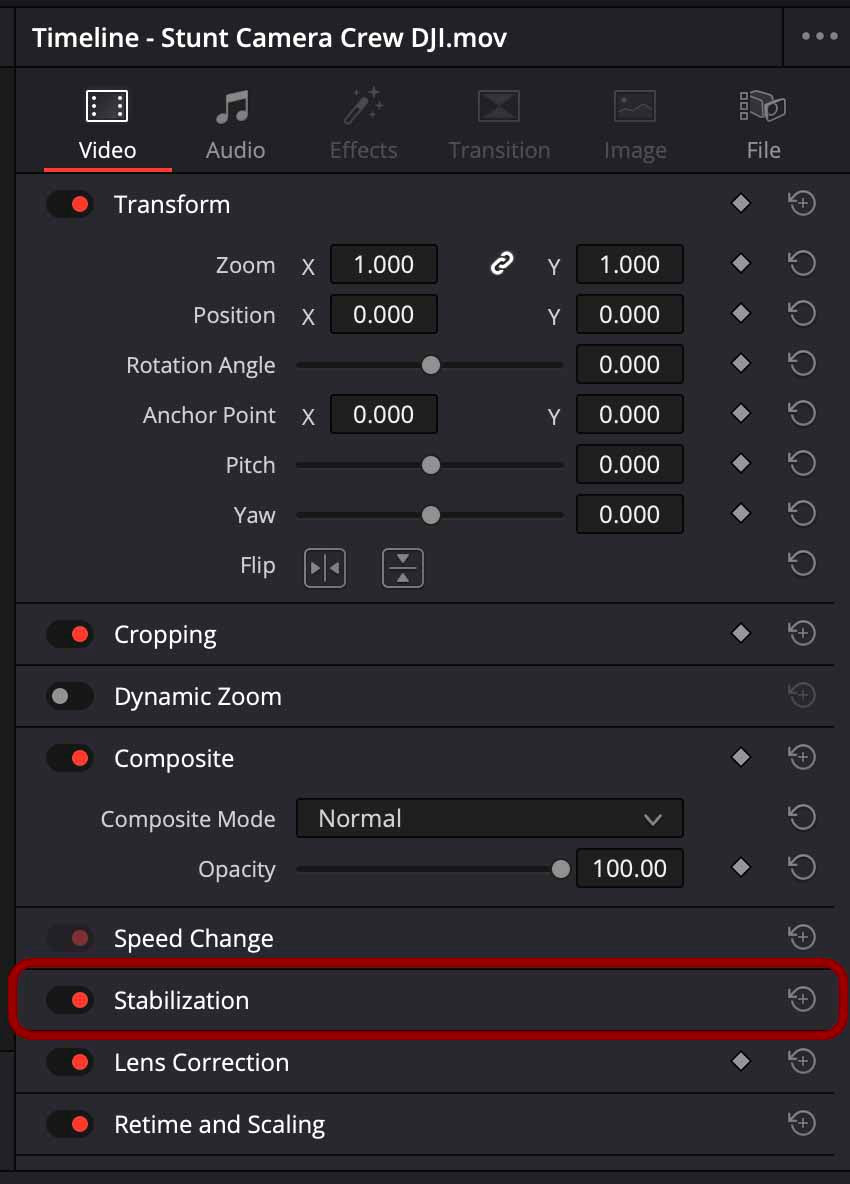
2. Open the inspector window of a clip you want to stabilize
Once you've decided which shots you need to stabilize, bring them into a timeline in Resolve's "Edit Page".
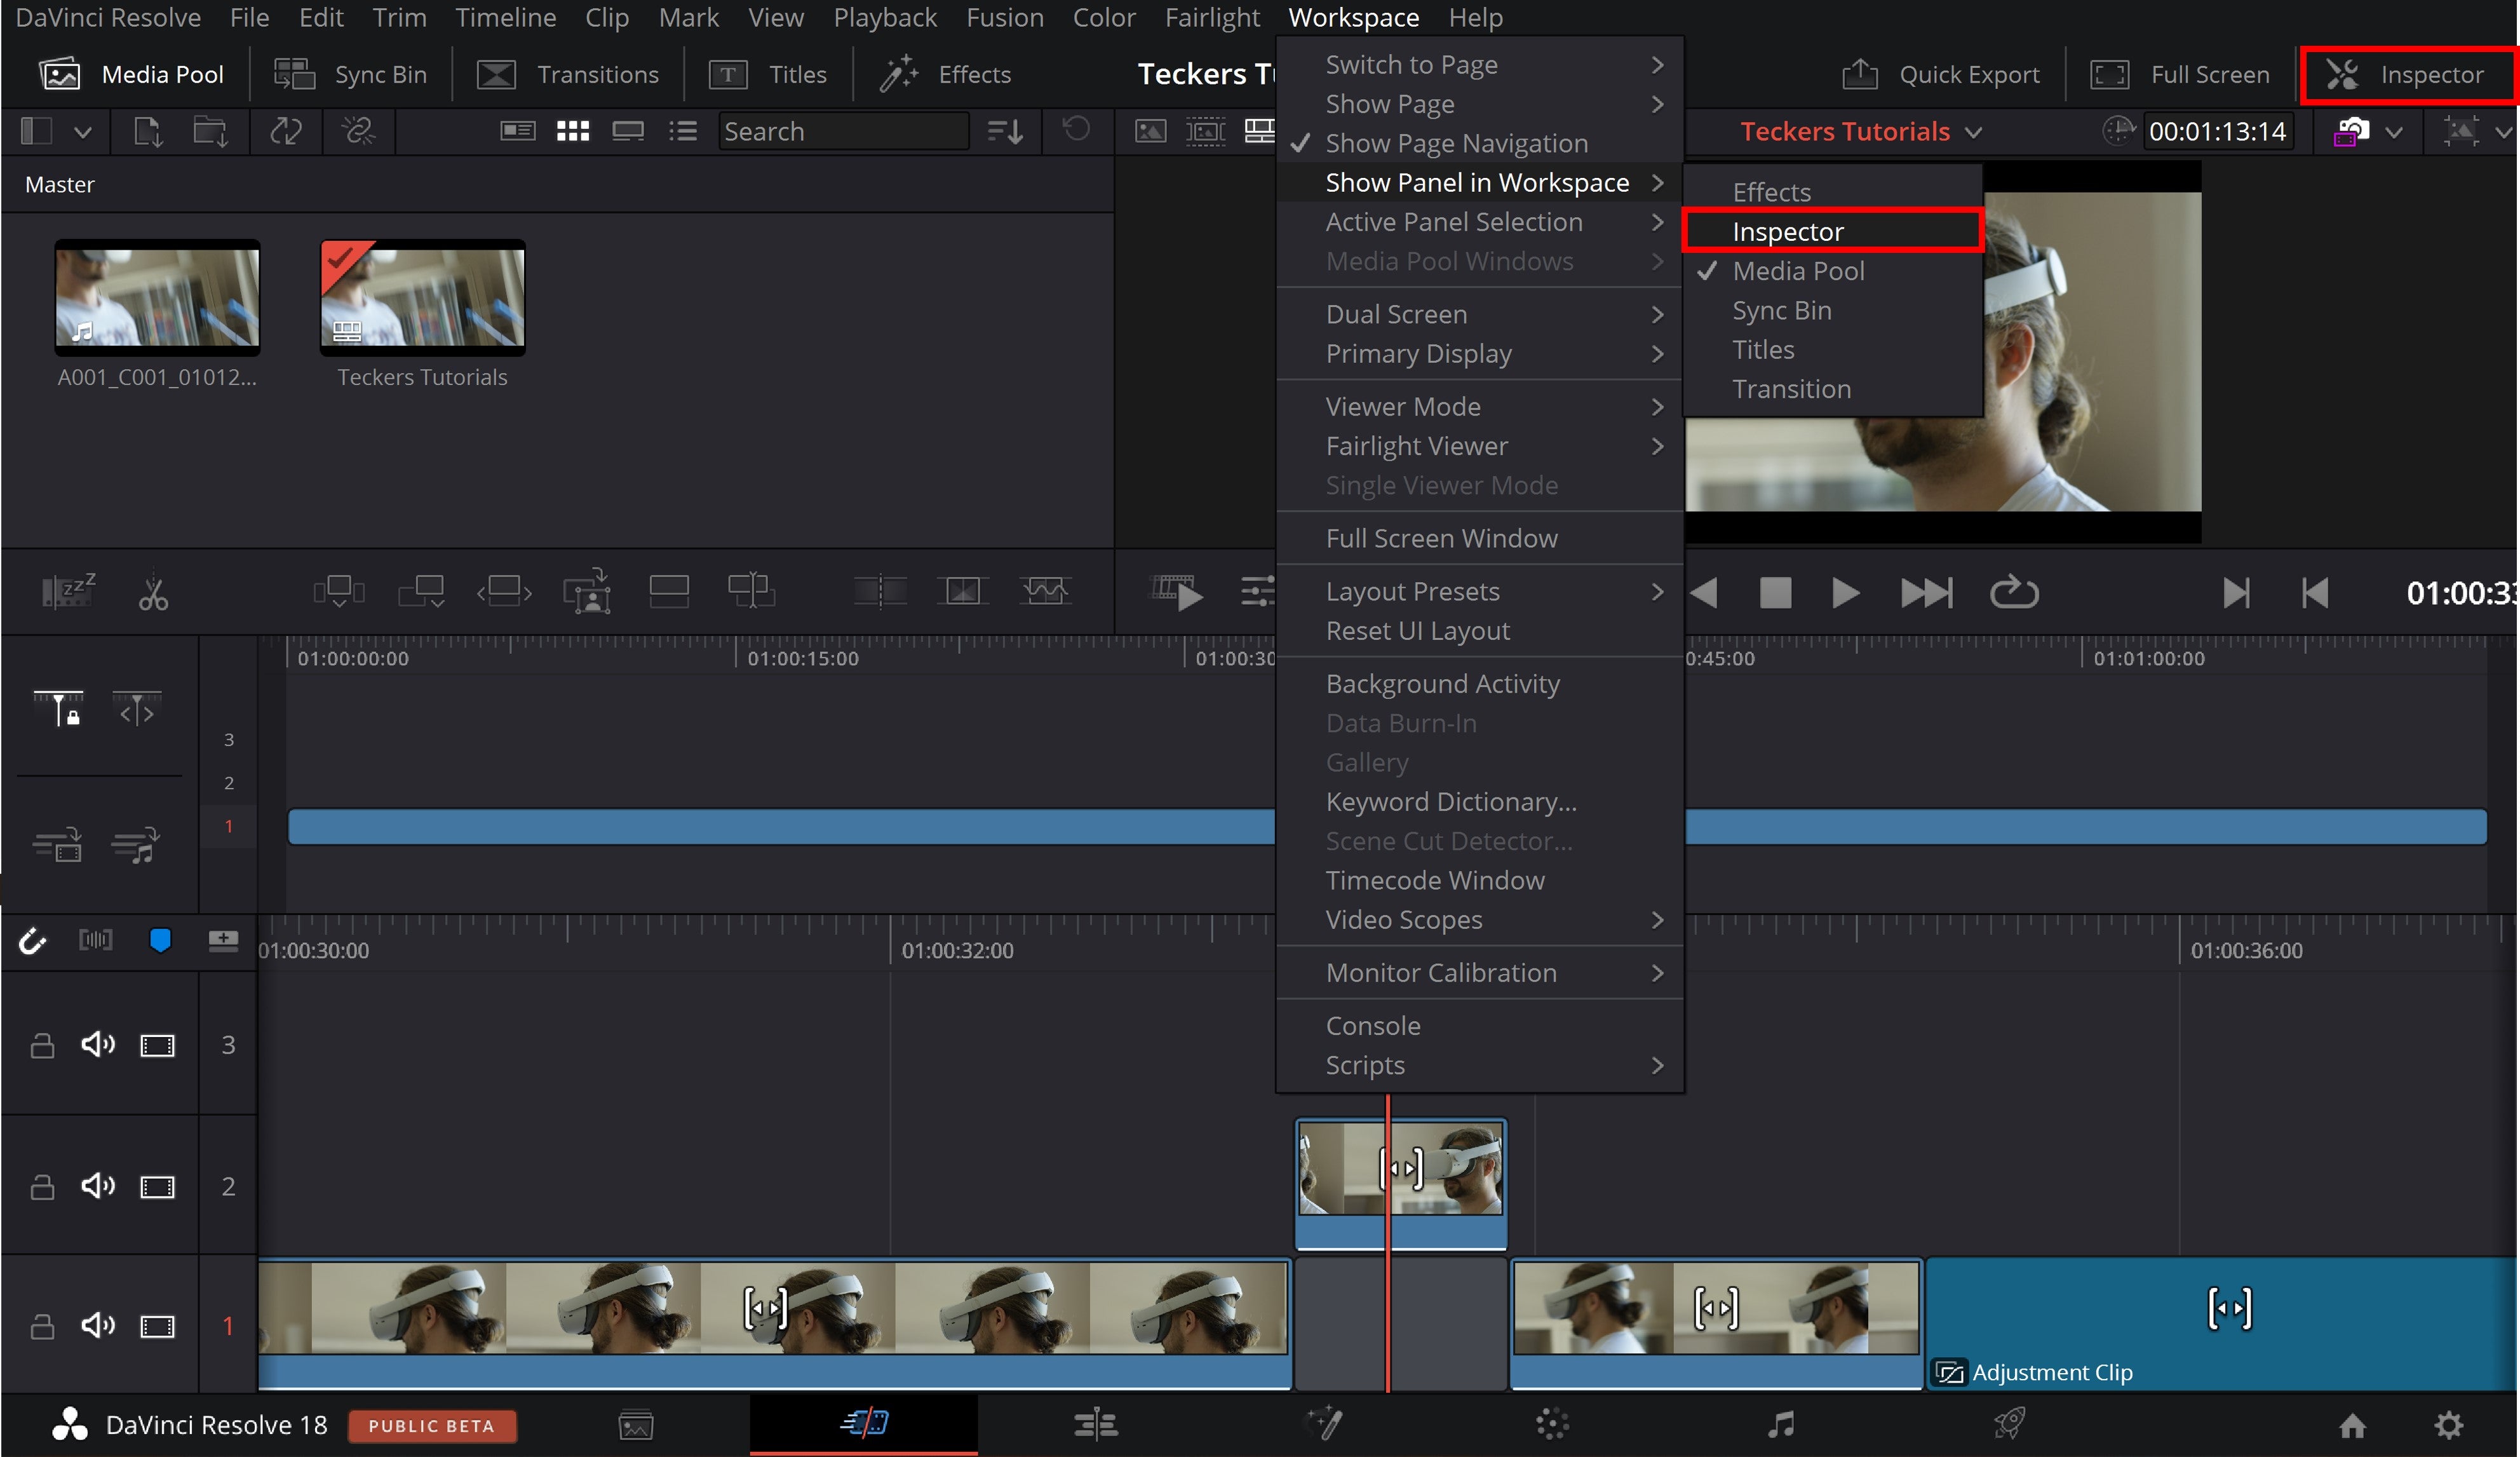
- Select your clip in the timeline
- Open the "Inspector" tab
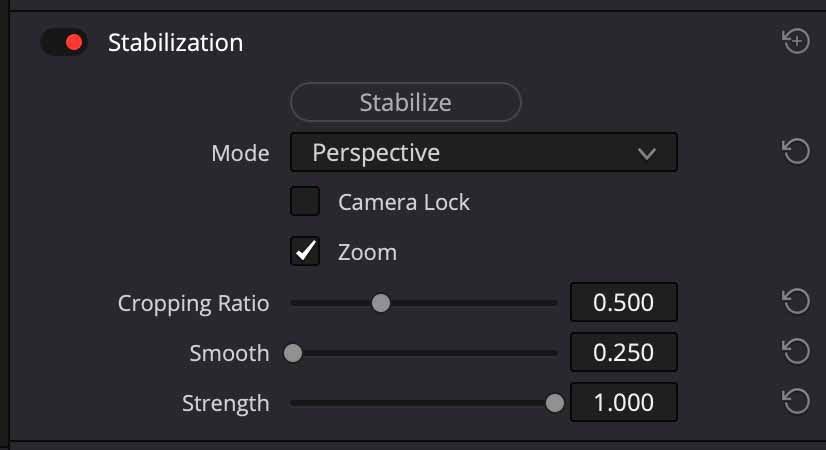
3. Go to the "Stabilize" tab
Resolve lists three stabilization modes based on the type of adjustments they perform. You will need to analyze the footage to see which one works best. Often, the process will involve a degree of trial and error.
The three modes for stabilizing footage in DaVinci Resolve 18 are the following.
Original
Translation mode
Translation mode is the simplest and least aggressive mode for stabilization in Resolve. It only uses pan and tilt analysis to stabilize shaky footage and doesn't analyze camera zoom or make yaw, pitch, and roll adjustments.
Because it only compensates for horizontal and vertical camera movements, it rarely produces disorienting perspectival distortions.
However, it may not be sufficient to smoothen more violent camera shakes and can produce jarring moves of its own if not handled appropriately.
Similarity mode
Similarity mode performs more complex operations than translation mode. Besides pan and tilt analysis, it analyzes a shot's zoom and rotation parameters in making adjustments.
It can compensate for more complex jitters than translation mode can. For the same reason, it can produce more artefacts and distortions.
Perspective mode
Perspective mode is the most complex stabilization mode in Resolve. Besides the parameters that the translation and similarity modes analyze, it also analyzes a shot for complex perspectival changes over a direction that can stem from unorthodox camera handling or movement.
3. Adjust the stabilization attributes appropriately
After selecting the appropriate mode for your footage, adjust the various stabilization parameters under the selected mode. These control the aggressiveness with which stabilization will be applied to your clip.
Once you have made your decisions, hit Stabilize.
After analyzing the footage, Resolve will make its adjustments. Review the stabilized footage to see if you are happy with the results. If not, a little trial and error will improve your outcome.
Remember, these adjustments are a trade-off: The smoother your footage gets, the more likely it is to look distorted or deteriorated. Of course, starting with the cleanest footage and shots that require the least amount of adjustment will dramatically improve outcomes.
Now, all you need to do is repeat the above process with your other shots. You may try applying the same effect across multiple shots, but this won't always produce the best results. At the least, you'll need to tweak your parameters a little.
Final thoughts
Stabilizing footage in DaVinci Resolve is relatively easy, but you'll need to put in a little effort to get the best results. You can also stabilize footage in Resolve's "Color Page", but that's a different article altogether.
Author
Robert Sutton