

Jan 2022
What are LUTs?
Simple & Technical explanations

What are LUTs?
So, what are LUTs? You're asking. You've come to the right place! We've been specialising in LUTs for many years now so we have decided to simplify the learning process of what a LUT is. We will also explain how it works, so everyone can understand them and how useful LUTs are.
The good thing about LUTs is they can be used in nearly any program that adjusts color. Because LUTs work with so many programs, they are more useful than traditional color presets that only work within one app. LUTs are universally read by all major editing software.
LUTs are also compatible on many different camera monitors to give you a live representation of what the final grade could look like on the video, in the editing suite or just to give you nice natural colors while shooting in Log color space.
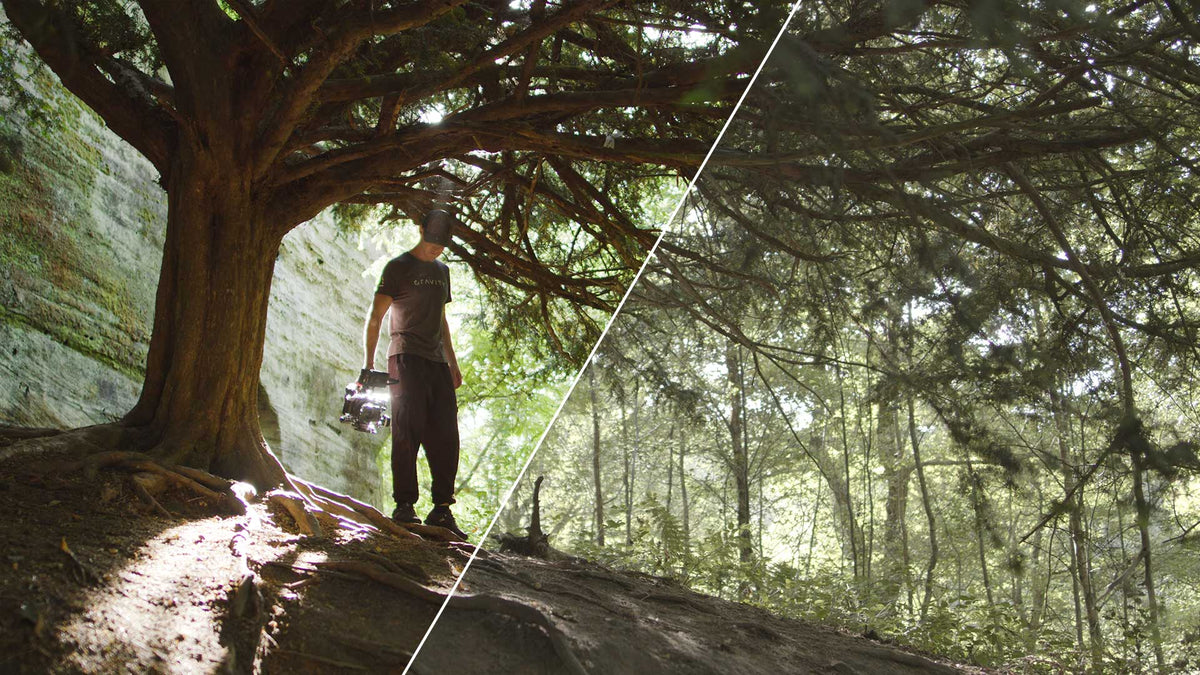
BMPCC Log Conversion to Natural LUT
Simplified explanation
A LUT is a color preset/filter that is universally compatible in nearly all video editing software like Premiere Pro, Final Cut Pro X, Davinci Resolve, Filmora, Avid and much more. They have many use-cases - color correcting, color grading, monitor calibration & much more.
LUTs are perfect for saving a set of colors to use another time, or use in other software. A LUT is the most efficient way of coloring or transforming the colors of your image.
Technical explanation
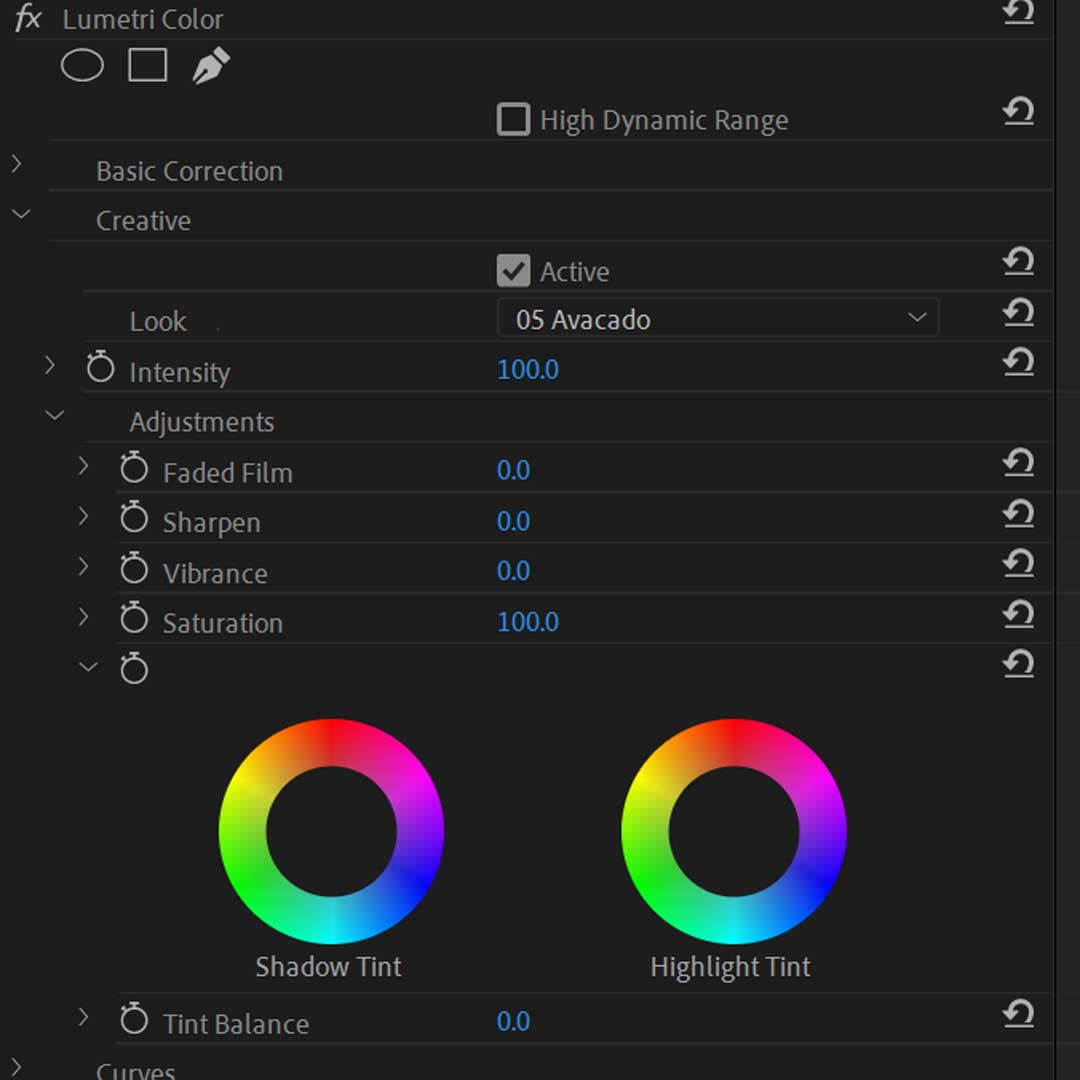
A LUT (Lookup Table) is essentially the transformer between two images, based on a mathematical formula. LUTs can be technical, creative or built specifically for cameras.
LUTs receive a color from the original image and give out a set of new colors. LUTs can do various things, increase saturation, decrease contrast, you name it. Some even completely change colors to achieve a cinematic color grading effect seen in movies.
They will often do a combination of styles, usually created to achieve a specific look. No matter how complicated an image may seem, a LUT is simply a process of color transformation that turns one set of colors into another.
Basic Log Correction LUT
Used for converting camera color spaces

Creative LUT
Used for adding creative colors
Benefits of LUTs
We want to introduce everyone to how easy and beneficial LUTs are.
LUTs are used in many different scenarios from creative looks, calibrating monitors or even log conversion LUTs. They are universal compatible in most video editing software which makes them ultra handy to transfer color profiles between all your software and devices. I will go into depth below about these reasons.
Easy to use
I cannot explain how easy it is to use LUTs. They are simply a small file, usually around 1MB, that you can use in all decent editing software. Each LUTs holds a specific color value and has many use cases from presets, monitor calibration and much more.
Compatibility
There's so much compatibility as they are the universal standard between hardware and software.
Software
LUTs are compatible with nearly all editing software. If they aren't compatible in yours, I would highly advise you to change your video editing software to something more updated and with the times. Check out my blog about the best editing software on the market.
If you want to achieve the same colors in different software, LUTs make it easy. All editing software have different color tools, so it's pretty hard to achieve the same colors in multiple software. LUTs can be used essentially as preset that transfer color values between different software and devices.
Devices
This is where LUTs are used in more technical environments. They are used heavily in color calibration processes, to calibrate computer monitors or even camera monitors.
LUTs are highly used to give a specific look on your monitor while filming in the camera world. Using LUTs help you get an idea of what the final footage will look like.
Especially when shooting in Log color space, it isn't easy to get an idea of how your footage will look after correcting it to natural color. It's hard to film in Log because it pretty much looks flat, black and white. To shoot in Log and have a pleasant shooting experience, camera operators use LUTs on their monitors to get a natural look instead of a flat, bland look.
Used for color calibration
You've most probably heard of color calibration, right? Well, it's been around for years. All monitors follow a set of color rules and provide a specific color space on the screen.
LUTs are used as a preset that holds the colors for the monitor to read. This technique is used in the film industry for on-set monitoring too. You can learn more about monitor calibration here.
Used for color correcting and grading
As I mentioned earlier, LUTs are used heavily in video editing. They can be convenient and powerful to those who don't enjoy the coloring process. There's quite a high percentage of people who don't enjoy the coloring process or even have the artistic skills to do it. This is where LUTs come in handy for creative video editing.
Then they come in handy for correcting Log footage to a perfectly natural look, saving the editor loads of time trying to fix it themselves. We have crafted a bunch of Natural LUTs for precisely this.
Learn more about color correcting vs. color grading.

Downsides to LUTs
There aren't many downsides to LUTs, but there is one that does bother some people - they cannot be adjusted or edited.
You can of course add edits on top of the LUTs, but you cannot edit the core value of the LUTs.
Another downside is that LUTs don't carry all color g rading information. They cannot change the exposure or any luma settings. They also cannot isolate specific colours to individually change them.
But despite this, if you really wanted to color grade to the top-level, you would be using DaVinci Resolve to color your own footage.
Why should you use LUTs?
LUTs, in simple terms, are video color presets that are compatible with all major editing software. There are different types of LUTs and many uses, from beginners to professionals on Hollywood films. You should look at our article on 5 Reasons why you should be using LUTs.
LUTs are most commonly used in video editing for creating and saving color grades, which are used in video projects.
They can also bring Log footage back to life by adding specific looks and styles or converting it into a Rec709 color space. You can even load a LUT into your camera monitor or desktop monitor. We use LUTs to calibrate your monitor on desktops, so you have the perfect true colors using monitor calibrators. On camera monitors, LUTs give you an idea of what the finished look of your film might be or even to see a natural look if you are using Log profiles.
So basically, to put it short, LUTs have tons of use-cases. There's no excuse not to be using them for any of the reasons stated above.They help everyone, whether they are professionals or amateurs.
Take a look a the list below to see who can benefit from them:
- Business owners
- Youtubers
- Instagrammers
- TikTokers
- Snapchatters
- Family videos
- Videographers
- Photographers
- Video enthusiasts
- Pet videos
Read more:
Video explaining LUTs
Important Guidelines Before Using LUTs
- Ensure white balance is correct when using LUTs! This will dramatically change the look of the LUT.
- Ensure your exposure is correct when using LUTs. You can use a histogram to help in camera or editing software.
- When using LUTs, your footage may need small adjustments to get optimal results, such as exposure, saturation, contrast, etc. depending on your preference.
- Shooting conditions such as lighting, weather, locations etc. can vary which can drastically affect a LUTs look. Some LUTs will work better in different scenarios. It’s best practice to experiment with which LUTs work best for your style and scenes.
Learn how to apply a LUT in Premiere Pro
in 10 Seconds
This method is similar in all other editing software. Very simple and straight forward way to import a LUT in Premiere Pro. This process is very similar in all major editing software. All you need to do is find the effect inside the software that will import the LUT.
Please ensure you have corrected the exposure and white balance on your footage to see optimal results using our LUTs.
play full video

Author
Will Sutton